5 To Do List Tools You Can Create and Use In Notion
Nov 02, 2022Most people’s to-do lists create more stress instead of relieving it. But they are supposed to relieve stress, so how can they have the opposite effect? The quick answer is that most to-do lists lack context. For some things, like “remember the milk”, that’s fine. That’s all the context you need. Or is it?
When should I remember the milk? If I remember it now, while I am sitting at my computer, that isn’t very useful. What is the next thing I need to do, to actually GET that milk? Either I need to know when I plan on going to the store, or when I plan to order it online via Instacart!
Even something as simple as remembering the milk needs more context in terms of when and how I plan to get it. Without that, it actually can create more stress, because I don’t know when or how, so my mind will keep reminding me that I still need to get the milk!
One of the things that caught my eye about Notion was the free-form style. In short, I can do things many different ways. I like the idea of a blank page that I can use to serve as the whole task, or how that page can be a window opening up to a world of projects and tasks all with some common thread.
The Simple To Do List
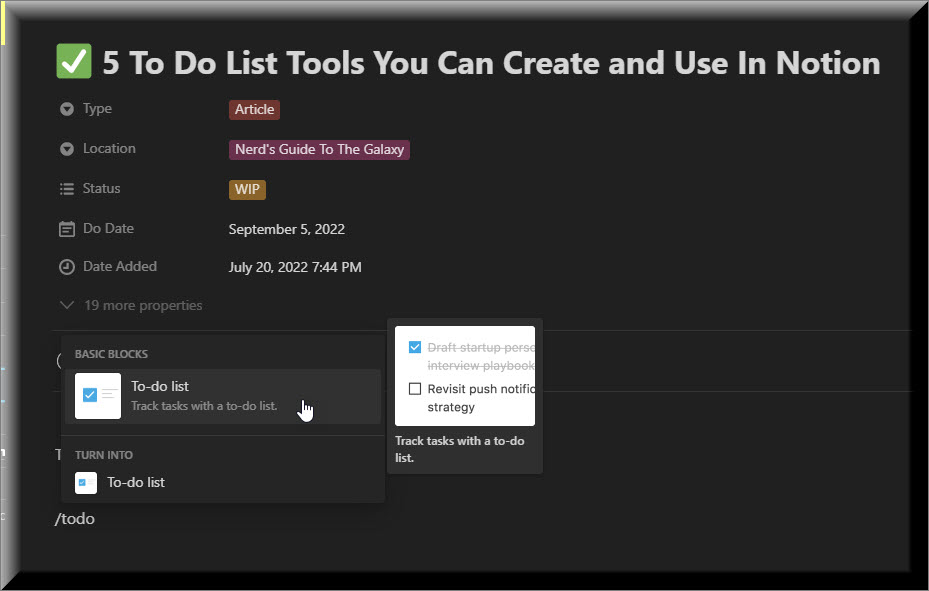
In Notion type the command “/todo”.
Click any image in this post for a larger hi res version
Once you do this, you will have a checkbox where you can type in the to-do item, and as soon as you hit Enter a new checkbox will appear for the next item on the list. This is great for checklists (like the list of items you need to get) but not great for context.
Since this is Notion, it’s easy to add that context, as follows:
By typing an ‘@’ sign and a weekday, Notion will bring up a calendar and let you set a date. You can also set a reminder.
By clicking on the date, you can bring up the dialog. If you set a Reminder, you will be notified in the Notion app, and you can also have Notion email you reminders in the settings.
Now you have a simple to do list with all of the context you need, so that this should reduce stress and not increase it. And now I am getting hungry!
Create a To-Do Button
Many of us use Notion to create dashboards with all kinds of information, and oftentimes in those dashboards we want a way to create a checklist like this quickly. Notion allows you to create Buttons for quick commands. In this case, it saves you the trouble of having to type “/todo”, which may not seem like much, but if you are like me and doing 1,000 things all the time, every little key stroke counts.
Type “/Button” to create a new button. The default will be a To-do button, and you can stick an emoji in there for a better visual.
Pro Tip: Anywhere in Notion type a “:”, and Notion will bring up an emoji dialogue so you can quickly search and select an emoji.
Once you click Close, you will have a button you can click to instantly start a new to-do list.
You can create buttons with all kinds of commands and even create templates that can be made at the click of a button. This is a great way to get started. Get creative with this!
Sections
Some people like to have a section on their dashboard where they can organize their To-do’s by weekday. This makes it easy to plan and move things around. In order to do this, we’ll need a column for each day of the week.
I like to use Notion’s Callout feature for something like this.
Type “/callout”.
Callouts have built in emojis, so you can create something like this very quickly:
Next, click on the callout and type CTRL+D to duplicate the callout and create the other weekdays. Then Edit each one to the other days of the week.
/call
Finally, click and drag them alongside each other to create the columns.
Now you can add your To-do’s under the day you want to accomplish them, and it is easy to click and drag them around to plan your week.
It might look something like this:
I’ve seen people stick Sat & Sun directly underneath Fri since the goal is likely not to work on those days.
If you are a fan of David Allen’s “Getting Things Done” method, you might do something like this:
To-Do Lists in Toggles
This is my favorite way to organize a lot of things I need to do. It allows me to tuck them away neatly until I am ready to take them out.
Type “/toggle”.
I like to think of a Toggle as a page-within-the-page that you can “zip up”. It helps to apply some color to the Toggle to make it stand out.
You can organize these in columns, just like the Callouts.
As I mentioned, you can zip them up when you are not working on them to keep your page clean. And you can even stick them in your weekday view – best of both worlds.
Pages as To-Do’s and Projects
What I love about Notion is its versatility. You can use its features in so many different ways.
Everything we’ve done so far has been based on laying out your To-do’s in various forms on a single page.
Now we’re going to dive into the use of multiple pages.
Think about what I said in the beginning. Most people’s To-do’s cause more stress instead of reducing it because they lack context. If you think of an entire page as something you can use for a single task and utilize all of the other things you can use on a page, the depth of the context you can provide on a task (and certainly on an entire project) is infinite.
Let’s start simple by adding Pages to our page, where each page will serve as another task or project.
Type “/Page”.
Then name your page (the name of the task or project).
Let’s say I am going to set up a page for each client where I can track all of their tasks.
Note the top. I am using the Notion page for this very article. Yours might be called something like [My Company Home Page] and then you’d organize a section for your clients’ pages.
Now you have a Main Menu with your client list, where you can click into each client’s page. Then, in each of their pages you can create all of the To-do’s you need.
Also worth noting is that I always set my pages to “Full Width”
A great way to structure it from here is to use a Database Table in Notion.
Click into your client and type “/Table”. Make sure you choose the Database and not the simple table.
Then add a new database.
Next, name the database.
Pro Tip!
Do not name the database the same as the page. In other words, do not call it Client X Tasks. There will be times when you will want to search for, link to, or move something to the database, so you will want the distinction. Come up with a standard convention for naming your client pages and their databases, and be consistent. You’ll thank me for this, I promise!
Then start adding pages. Each page can be its own task, or a group of tasks, or a whole project. The way you want to set this up is entirely up to you. You can be as detailed or as high level as you want.
In this example, I have a page for all banking tasks with checkboxes for each item. You could use Toggles instead (see further back). You could even add another table view for the banking tasks within the banking page.
One (maybe a little more) word of caution!
Get too bogged down with the details and you spend too much time organizing and not enough getting the work done.
This is an art, not a science.
You have to find the balance between making sure everything is captured, clarified, and organized without the process itself getting in the way of you getting the work done.
I love Notion because of its flexibility. It keeps me sober because I get to play around with different ideas and layouts and for me that is fun. What keeps me sober might get you drunk!
If you like to be able to customize your apps and bend them to your will, then by now (having seen all of this) you are probably already in love with Notion!
Got questions? Use the Ask Nerd link on your right!
READY FOR BLAST OFF?
Hop On 'Nerd's Guide to the Galaxy' and Experience the Ultimate in FREE Coaching, Resources and Training...
- Live workshops, trainings and recordings
- An intimate community of like-minded people
- A FREE course (and you choose your interest)
- Preferred access to my inner circle
- A Free subscription to my newsletter "Nerd's Words"
- Blog Post Notifications
- And MUCH MORE!
We hate SPAM. We will never sell your information, for any reason.


